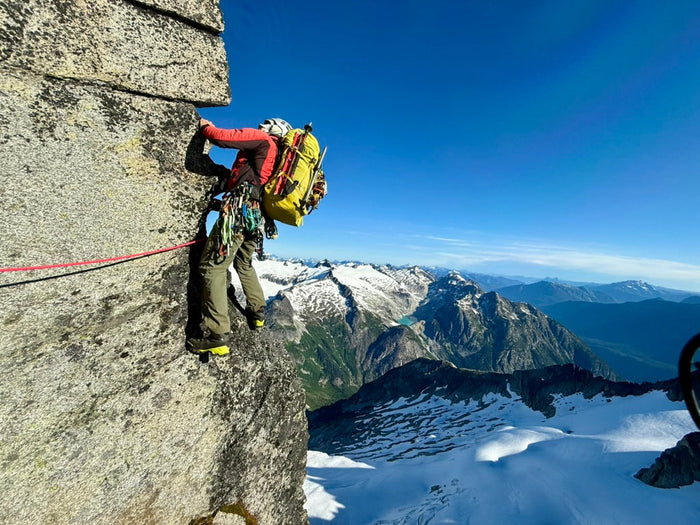
A Route Guide: Dragontail Peak Backbone Ridge
When Jessica approached us to guide this route we were fully on board and with a guaranteed long day we had prepared for another epic journey up the Backbone Ridge on Dragontail Peak. This long alpine rock route is rated 5.9 IV+ meaning it's a full day or more of technical climbing with long and challenging options to retreat. In particular the Backbone follows a broken ridge line from low on its North Face taking steps of good climbing as the spine undulates for nearly 1800 vertical feet to the summit.
In August Guided Exposure owner Jere Burrell led a unique climbing trip in one of Washingtons premier climbing areas the Enchantments. This area is chock full of high class alpine rock climbing on stellar granite. From towers to faces to ridge lines from cracks, faces, and slabs there is a climbing style for everyone. Lined to the north by Icicle Canyon and nearby Tumwater Canyon, the Stuart Range offers climbing that requires a more committed and durable mind set. With the legendary Snow Creek Wall requiring a minimum hour and a half approach this is the shortest in the range. For the devoted and motivated adventure seeker routes such as the West Ridge of Prussik Peak, Acid Baby on Asgard Sentinel, and the Serpentine Ridge on Dragontail Peak beckon to be climbed in a day. With strict permit requirements single day missions are common place for the long approaches and long routes that exemplify the Stuart Range, the Alpine Lakes, and the Enchantments. When Jessica approached us to guide this route we were fully on board and with a guaranteed long day we had prepared for another epic journey up the Backbone Ridge on Dragontail Peak.
This long alpine rock route is rated 5.9 IV+ meaning it's a full day or more of technical climbing with long and challenging options to retreat. In particular the Backbone follows a broken ridge line from low on its North Face taking steps of good climbing as the spine undulates for nearly 1800 vertical feet to the summit. With a mix of scrambling and good pitched climbing this route offers some technically hard challenging pitches, some generic broken terrain in the middle of the route and high quality moderate pitches higher up. The position and abundance of climbing make this one for any aspiring alpine rock climber. But be warned this is a long committing route with route finding, rock fall, and surprisingly hard crux climbing.
Returning to this route 8 years after my 1st romp up the route there still doesn't seem to be much info for the route other than some vague storytelling and a series of go pro videos to follow. So we have compiled an accurate and thorough description to aid climbers in an efficient climb.
Gear:
- 60m Rope
- Rack: Single Rack .3-#6, Doubles #.4-#3, 1 set of Offset nuts, 12 slings and draws total
- Lightweight Crampons & Ice Axe
- Seasonal dependent foot wear: Climbing Shoes and Crampon Compatible Boots or Approach Shoes
Approach: Trail Head to Lake, Lake up moraine
The well worn path from the Colchuck Lake Trailhead ascends to the trail junction in about 1.5 hours uphill. Take the left fork at a flat intersection where a sign marks a toilet. Cross a bridge over the creek, turn right headed upstream, after a few minutes the trail runs into a large boulder and a smaller stream crossing, trend right across the stream, and continue on the trail through the forest. After reaching a tree line with the first, albeit before sunrise, views of the peaks and lake, turn right and trend back into the forest up switchbacks and a well worn path. Eventually you'll reach more rock slabs follow these down towards the lake picking up the trail around the lake. After passing campgrounds you'll descend out of the forest into large talus blocks. Follow cairns towards the middle of the talus once you reach a large boulder and a few trees start hiking uphill finding a climbers trail leading up the moraine eventually there is a small creek on your left. Take this up until crossing moraine features to the left side and continue up as the route and approach comes into sight. Assessing the size of the snow patch determine how far up the moraine you'll travel before crossing over to the ledges approach. 3-4 hours to here.

Size of the snow patch determine how far up the moraine you'll travel before crossing over to the ledges.
Moraine to Pitch 1 Terrace:
Exiting off the moraine you'll cross a perennial snow patch. The size varies year to year but is usually there. Crampons and axes were nice on the short section of snow that remained but micro spikes or just crampons would work for a light and fast ascent team. On the other hand this patch of snow could have been avoided by stemming between the snow on your right and a rock wall on your left. After crossing the snow a loose gully option leads to gravel ledges that are grassy at times. We followed loose rock for the first 40 feet then scrambled steps of 4th class to reach easy left trending benches. Zigzag scrambling to the far left up and diagonal back to the far right along ledges, grooves and ramps. Turning back left again leads up to a short 5.4 pitch that ends at a tree with slings on it. Climb this face and cracks to a good ledge and belay on either a terrain belay or build an anchor. After reaching this ledge follow it right to a large spacious terrace platform and the beginning of pitch 1. While this ledge is very large and a fall seems unlikely you could place a hand sized piece to secure the belayer.

Zigzag scrambling to the far left up and diagonal back to the far right along ledges, grooves and ramps.

Scrambled steps of 4th class

Followed loose rock for the first 40 feet

Easy left trending benches

Back to the far right along ledges, grooves and ramps.

Short 5.4 pitch that ends at a tree with slings on it. Climb this face and cracks.
Pitch 1: 5.6 30m ⭐️
From the large platform terrace climb directly up blocks and cracks climbing past a small dihedral and up to a ledge, place a directional and walk the ledge left to the bottom of the obvious off width and belay. Anchor takes finger sized cams and nuts.

Climb directly up blocks and cracks.

Place a directional and walk the ledge left.

Anchor takes finger sized cams and nuts.
Pitch 2: 5.9 30m ⭐️⭐️⭐️⭐️
Pull up into the crack and place some small gear early. Good stemming and jamming with featured slab on the right as the crack steepens and widens to a BD #4. After the small chock stones appear a #5 places nicely and can be bumped as needed. Fire the off width and place the #6 high and continue bumping the cam. Don't place it too early and risk over camming the #6 and leaving it behind as we found 2 of them, brand new stuck in the crack. As the off width angle relents the slab on the right looses features and becomes a proper off width with toe heel bridging, chicken wings, and side pulls (Gaston) that work enough to clear this blank section. Soon after, cracks and features appear overhead on the left with finger and hand size gear. Finish straight up on the wide crack or climb out of it to the left on face holds and cracks. Belay at a good stance above the off width using hand sized gear #1-#3.

Good stemming and jamming with featured slab on the right.

Above the crux cracks and features appear overhead on the left with finger and hand size gear
Pitch 3: 55m 5.7 ⭐️⭐️⭐️
From the top of the pitch 2 off width, shuffle your belay left onto a small but comfortable stance to avoid rope drag on pitch 3. This belay had a fixed pink tri cam but takes finger to hand size stoppers and cams .4-.75. Climb directly up the large open book corner on cracks. Just above mid pitch the corner bends slightly left. About 10m below the small roof exit the corner cracks and climb a short steep step up and right to a well established and comfortable belay stance now directly right of the small roof. Smaller finger tip sized cams and offset stoppers work well in the cracks for a belay.

Shuffle your belay left onto a small but comfortable stance.

Climb directly up the large open book corner on cracks.

Smaller finger tip sized cams and offset stoppers work well in the cracks for a belay.
Pitch 4: 5.8+ 50m ⭐️⭐️⭐️⭐️
From the comfy belay stance climb the low angle finger crack using edges up to the well protected and narrowing crux. Find good small feet or smear reaching past the narrow crack and lock back into good fingers and good pro. From here the crack widens to BD #4 or #5. Take a big step left into the right facing dihedral or better yet make another move higher and take a shorter step left into the dihedral. At the top of the dihedral exit left on stacked blocks. Either belay here for better communication and less rope stretch or continue directly left across broken terrain for about 15m and belay at another good stance that looks back across the pitch and up the next pitch. Anchor took finger to hand sized cams .5-#2

Climb the low angle finger crack using edges.

Good stance that looks back across the pitch.


Anchor took finger to hand sized cams .5-#2.
Pitch 5: 5.6 55m ⭐️⭐️
As the ridge angle eases and widens the next pitch gets a bit nondescript and offers a variety of options. Continue pitching or start simuling directly up from the belay aiming for a notch with large spiked boulders. Pass through then up left on an easy wide crack #5, watch rope drag and consider pro placements to mitigate rope snags. Continue up on easing terrain and lichen covered rock. From here you should be able to see the upper headwall and the Fin Direct. Our random belay stance was above a small wide chimney and took hand size cams #2-#3. Another possible option is to start with a traverse left from the belay then climb directly up on 4th class steps, ledges, and passageways. If you were to go even further left this would lead towards the Triple Couloirs.

Directly up from the belay aiming for notch with large spiked boulders.

Up left on an easy wide #5 crack.

Random belay took hand size cams #2-#3.
Pitch 6: 5.5 and Ridge Scramble ⭐️
From the last belay contour up and left around big boulders. Scramble up the ridge preferring the left side until you reach a short 5.5 pitch to either solo, simul, or short pitch. After this continue over some loose rock and gravel towards the base of the headwall following easy terrain and stopping at a large terrace.

Short 5.5 pitch
Pitch 7 & 8: 5.7 45m-120m ⭐️⭐️
A couple options exist to start up the headwall. The easiest is to do a short scramble directly left from the terrace into the wide gravel apron and ascend it on loose rock up the ramp. As the ramp and gulley narrows build a belay in good rock on the ridge crest to your right and belay the next section. Climb the ridge crest, then trend up and right into a low angle dihedral slab with small gear. Take this up to the left leaning ledge and build an anchor in a small inset with finger tip size cams and nuts. Several anchor options exist but this seemed to nicely feed into the next pitch.
Option 2: Another option is to start pitching or simuling from the terrace. If belaying from the terrace you will need to simul to reach the next belay stance on a left sloping ledge and the start of the subsequent pitch. But start from the terrace by climbing up the face on cracks and edges, into the gravel apron gulley, back right to the ridge crest, then trending up and right into a low angle dihedral slab with small gear. Take this up to the left leaning ledge and belay.

Base of the headwall

Start from the terrace by climbing up the face on cracks and edges.

Low angle dihedral slab with small gear.

Left leaning ledge
Pitch 9: 5.8 45m ⭐️⭐️⭐️⭐️
Part 1: A tricky but easy start from the left leaning ledge leads into cracks and face climbing with PG rated gear spacing. After pulling up onto the face you'll have a couple cracks to choose from. To the left a nice left leaning crack looked clean and fun and would also place you in a great belay stance for the next pitch. The other option is a grassy/ mossy crack branching to the right. The grassy crack maybe a bit easier but requires you to place a directional or shuffle your next anchor to the left end of the next big flat ledge. Either belay here or link this with the next pitch. Breaking it up would be a good option if you need a ledge for a break, bivy, or gear shuffle.
Part 2: Move to the far left along the big flat ledge and the left side of the upper wall. Here beautiful cracks continue climbing up over a horn and a small right facing inset corner, into more hand cracks and up to another large ledge with a lot of loose blocks and column of rock. Try to place a high directional after reaching the ledge to prevent rope induced rockfall. Belay at the left end past a column of rock below a clean right facing corner and finger crack. Anchor takes small hand to finger sized pieces. Be sure to save a couple finger size pieces for the leader of the next pitch.
Decision Point: From the large flat ledge the upper headwall takes on a variety of route choices. We chose to stay on the left side following along the edge of the headwall jamming moderate cracks with beautiful exposure tracing the aesthetic spine of the Backbone Ridge. This is a great moderate option and is described. On the other hand choosing cracks in the middle of the face and veering right up the headwall will lead to a couple more pitches of climbing and avoiding some loose rambling climbing of pitch 12 and ideally leading into the traverse on pitch 13. Worth mentioning the central and right variations of the headwall may offer more pitches of 5.8-5.9 climbing. However this is not described and I have not verified this suspicion.

Anchor in a small inset with finger tip size cams and nuts. Tricky but easy start into cracks and face climbing.

Beautiful cracks continue climbing up.

Large ledge with a lot of loose blocks and column of rock.

Belay below a clean right facing corner and finger crack. Anchor takes small hand to finger sized pieces.
Pitch 10: 5.8+ 35m ⭐️⭐️⭐️⭐️⭐️
Pull up into the stellar solid finger crack with good but small feet. Careful to watch for ledge fall potential and jamb the right facing corner. Take a step right, then back up into more cracks turning onto the upper headwall directly below the gendarme punctuating the left side of the fin. Continue up cracks along the left edge of the face to a perfect stance directly below the fin. Anchor takes a variety of sizes but hand sizes fit great #1- #3. Stunning movement on superb rock in spectacular position.

Stellar solid finger crack & take a step right.

Upper headwall directly below the gendarme.

Stunning belay stance

Anchor takes a variety of sizes but hand fit great. Follow a prominent ledge and foot traverse right.
Pitch 11: 5.7 58m ⭐️⭐️⭐️⭐️
Follow a prominent ledge and foot traverse right placing spaced out gear occasionally above the foot ledge but more likely at your feet. This may take those #4, #5, or #6 as well. Ours were packed away at this point but might be a good size to protect the easy but runout traverses. After traversing follow a featured inset crack upwards. This section has grass and dirt with sections of questionable rock. While the climbing is moderate and well traveled the potential to dislodge a rock while stepping up or pulling down seemed possible to likely. So being selective about good gear placement and which way to pull or step up was important. Midway up this section an optional belay on solid rock exists in a small pod. You may choose this option if your rope is short since going into the notch between towers will be a full 58m pitch. After the grassy blocky inset exit right into another run out foot traverse. Gear placements will again be at your feet and a large cam might work here. The cracks end at a notch between gendarmes. Build an anchor here among questionable blocks with hand sized pieces and threaded or slung blocks.

Optional midway belay in a small pod just above.


Anchor here among questionable blocks, hand sized pieces, threaded or slung blocks.
Pitch 12: 5.7 ~35m ⭐️
From the notch between gendarmes follow the ledge system just under the ridge proper. Passing gravel ledges, up a short step of brown blocks, stepping left around a small wall being careful to place pro to manage rope drag and snags. Continue again back up right through broken loose blocks and into another notch in the ridge line. A short step up and right takes you onto better rock and pro for a short face move under a small gendarme and back to the ridge proper. Belay at a good wide stance with a view of the summit. Hand sized pieces fit behind a large and potentially displaceable flake. Use caution and look for potentially better stone.

Follow the ledge system, under the ridge proper, passing gravel ledges.

Another notch in the ridge line, short step up and right, onto better rock and pro.

Short face move under a small gendarme.
Pith 13: 5.5 25m ⭐️⭐️
From this stance traverse a short pitch across the ledge, take a reachy step down, then around the corner. Establish a new belay below another inset. There are several options but climbing the first wide inset crack with steppy moves provides solid rock, good pro, easy climbing, and a good rhythm to another great belay on a ledge 25m up.
Decision Point Reviewed: Where this ledge traverses appears to be where the rightward headwall option from the big flat ledge of pitch 9- 13 tops out. From the big flat ledge in the middle of pitch 8/9 start working cracks and dihedrals up and right. Passing the undercling described in other descriptions then up again on a nice looking face under this traverse. End on the traverse ledge or around the corner in the pic below.

Traverse across the ledge, take a reachy step down, then around the corner.

Wide inset crack with steppy moves

Last traverse ledge towards the summit above
Scramble to the summit:
I recommend switching to approach shoes or mountain boots from here to the summit. Short rope and scramble right along the ledge, up left through loose gravel in a shallow gulley apron, and then up and right over class 3 all the way to the summit.
Alternatively after ascending the loose gravel apron contour below the summit around to the left and gain the descent trail and walk to the top. This option is a bit longer but easier.
Descent:
From the summit follow well worn trails downhill then trending left towards a saddle with a small glacier below it. In most cases crampons will provide the most security an ice axe is a good addition too. Depending on the snow and ice conditions micro spikes could work if there are already big bucket steps in the snow. But it's unlikely to know this for sure before starting the route. Trend skiers left as you descend the glacier towards exposed rocks. Earlier in the season descending straight down the glacier to the flats then contouring left seems like a good option. Cairns could mark the way towards Asgard Pass but an actual trail is not really present until Mist Lake which is adjacent to the Asgard Pass Trail. Descend Asgard Pass eventually staying on the right side towards Asgard Sentinel back to Colchuck Lake.

From the summit looking over Mist Lake & Asgard Pass
Extreme Caution Advised:
In several route descriptions a rappel was mentioned for an alternative descent to avoid the glacier. We explored this option and deemed it unviable. One fairly good anchor lead to an atrocious second anchor. After investigating for alternative anchor options we retreated to the standard glacier descent which we were prepared for. If you choose to explore this rappel option be prepared with extra cord and gear to build 3-4 rappel stations. Consider bringing a v thread tool to assistant with natural anchors via threading options.

We explored this option

One fairly good anchor

An atrocious second anchor
In summary the Backbone ridge offers some spectacular position mostly moderate climbing on a big north face and stunning scenery. The hardest pitches offer some incredible movement and rock quality and the same goes for the headwall section on the upper mountain. In between sections of good climbing loose rock, vague route prominence, and inconsistent steepness detract from an otherwise flowing alpine movement. The result requires the smooth ability to transition between climbing styles such as scrambling, soloing, pitched climbing and simul climbing. While on guided trips such as this we use the rope and belays using pitched, short pitched, and short rope techniques to manage risk or likelihood vs consequence using the best technique for the terrain while maintaining an adequate pace. The juice was worth the squeeze once again on Dragontail!
Get trip reports & tips
Conditions, new trips, and mountain skills — straight to your inbox.
More from the journal
North Ridge Forbidden Peak: A Complete Route Guide
Planning to climb the legendary North Ridge of Forbidden Peak? This complete route guide covers everything you need to know, from the...
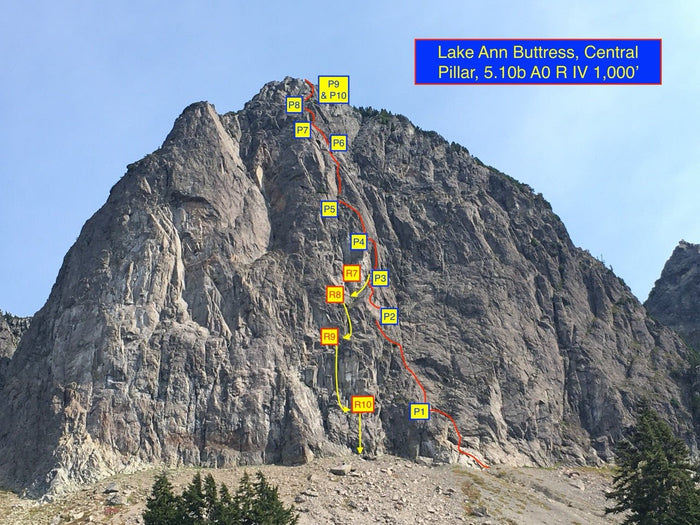
Route Guide: Central Pillar Lake Ann Buttress 5.10b R, 10 pitches, IV 1,000'
A route guide to the new alpine rock route on the Lake Ann Buttress called The Central Pillar. A useful route guide...
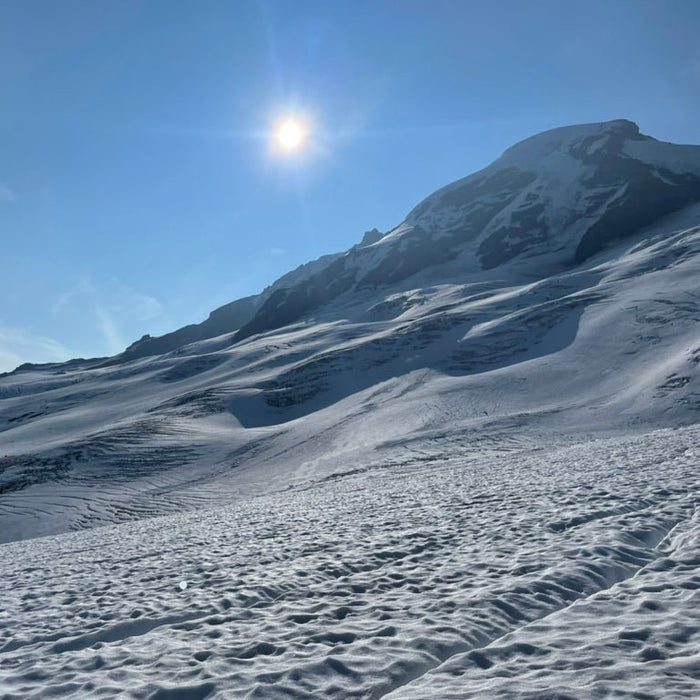
Route Guide: North Ridge Mount Baker
A detailed route description of the North Ridge of Mount Baker during a mountain guided ascent by Guided Exposure.